Tuesday, July 31, 2012

Ravellenics Update #1


As many of you know, the Olympics started last Friday in London. I was home that weekend so I was able to catch the opening ceremonies, which will probably be all I catch since I don't have cable at my new apartment. 


I was a little hesitant to join in with the Ravellenic Games, simply because I didn't want to get overwhelmed. But after a bit of persuasion and thinking I decided to give it a try! What better excuse to knit all day and get some stuff done? 

I am currently on Team Catitude, a team set up by the Ravelry group "My Knitting Has Cat Hair in it". I have only been a part of this group for about a week, but they seem like a fun bunch and I can't to get to know some of the members.  I have decided, for the time being, to participate in three different events. 

Event 1: Bag 'n Tote Backstroke

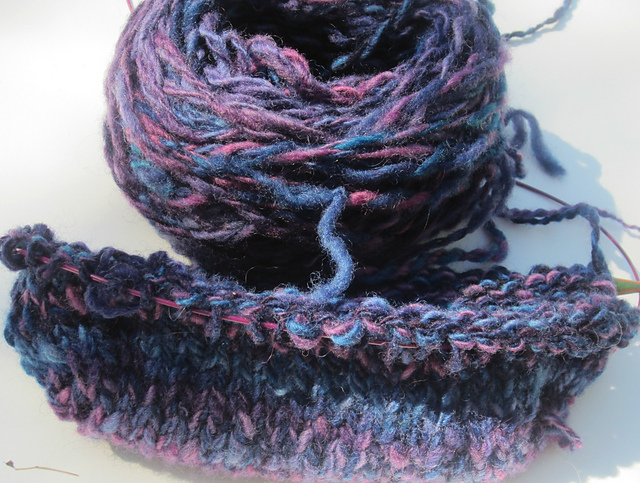
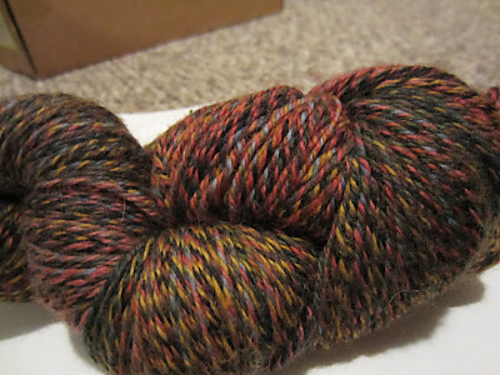
My 13 year old sister is finally at that age where she needs a purse, and last weekend she asked me if I could knit her one. Of course I said "Yes!" and promptly led her to my computer to let her look at my stash on Ravelry.  Naturally, she picked out the weirdest yarn possible: Lavendar Whorl Handspun. For those who may not remember, this yarn is a combo of Ivy's spinning and my plying and is an loosely plyed, bulky yarn.  I was hesitant to cast-on at first, because I didn't think this yarn would make a good bag, but now I am really glad I did!
Miranda's Bulky Bag is an improvised design that I am knitting like a toe-up sock and plan to make like a messenger bag (with the flap that goes over the front). As fast as this is going, it should be done by the weekend...if I have enough yarn. I think I will also publish this pattern if it works out. 

Event 2: Sock Put

Something I already had started, my Dark Rainbows Ribbed Socks are coming along very fast now that I have a real excuse to work on them. I am about half way up the foot of both and hopefully will be at the heel by the weekend. I am really liking this pattern now that I have it down and the color is really popping with it. I can't wait to finish these bad boys!

Event 3: Charity Rowing

As most of my older readers may remember, I am huge into Relay For Life, and I plan on doing it again this coming year. One of my team mates thinks we can get in cheap at a craft fair, so I have been knitting these winter headbands like crazy on my work breaks. It only takes about 2 days  ( 4 half hour breaks) to make one band, which means my stock is already up to about 12! WOW. As you can see above, I haven't added the borders and decor to most of them yet, my focus is more on getting the bodies done.  The borders are to be done in handspun, handdyed yarn so that will make them even more special.  My goal for this event it to have 14 done by the time the Ravellenics are over. 

So, anyone else participating in the Ravellenics? What team are you on, what's your event(s)? I'd love to hear about what you are all up to, it's always so much fun to read and comment on all of your amazing work, just like I hope it's fun for you to do so with mine. Happy Tuesday!

~Lisa


Monday, July 30, 2012

MIY Monday: Adding a Touch of Love to Your Herb Garden.

Good morning! This is an early post for me today so that if anyone is interested they can participate in my MIY Mondays!

I had a very successful weekend, including lots of knitting time, which will be talked about tomorrow, but for today I want to share with you a craft idea I had for a very close friend of mine.


As always: My MIY Mondays's Mission is share creative, innovative, fun and (hopefully) cheap ideas and projects for you home and life, as well as healthy and (hopefully) cheaper alternatives to everyday cooking, shopping and eating out. I hope you will join in my on my mission!

So my great friend Ivy (Pumpkin Spins) is about to embark on a new journey in her life, Grad School! And she is moving into a brand new city and apartment. She had mentioned she wanted to start an indoor herb garden, and after receiving an amazing wooden cutting board from her as a housewarming gift, I knew I had to give her something equally as special.  Me being an artist, I decided to try painting some ceramic pots to grow herbs in.


All that was really needed for this project were ceramic pots (depending on size, under a couple bucks at Home Depot), Acrylic varnish/sealer for the insides, and acrylic paint (I used paint specifically for ceramics, but any will do) for the outside.

After researching a bit about how to paint pots, I went at it. I started by applying the varnish to the inside so that, when the plants and dirt are added, no water can seep through and ruin my hard work. I personally applied 3 coats, but more is always better! Also Acrylic varnish is what I used, but oil would also work.

The next step is the fun one: Getting to paint! I didn't want pencil marks everywhere so I sketched these out on paper first and then decided on a final idea.

One thing I love about acrylics opposed to oils is that they dry fast, so fast that smooth blending is usually not an option.  In the case of these pots, that was perfect. Being able to layer colors and values without worrying about them mixing was so refreshing and really led well to the overall feel of the images.

Another thing I liked was that I had decided to apply black 'outlines' to parts on the images, which helped with the graphic nature of the pots, which is what I was going for. I like the whimsical, cartoonish feel that I was able to get. The type of paint I used really helped too. Found in the aisle with the other cheap craft paints, this was designed specifically for ceramics and outdoors, which made thicker and more vibrant against the orange of the pot.


After letting them dry overnight, I packed them up super well and shipped them off to my friend. A day later I received the most amazing text about how much she really, truly, LOVES these pots! There is no greater feeling than knowing that a gift is appreciated, especially a hand made one.

My aunt loved them too (she helped me pack them up) and seems to think that I should sell more at Farmer's Market? They only took about an hour each to make, what do you all think? Would it be worth it?

I hope everyone had a fabulous weekend like me! I had so much fun and so much success this weekend, I just didn't want it to end!

~Lisa

Wanna participate? Fill out Mr. Linky and feel free to use my banner above!


Saturday, July 28, 2012

Saturday Evening Book Review: Blast from the Past

Hi guys! Sorry I have been so dead on my blog again, but starting this week I am going to be getting better with posting and doing better photos and content!

So tonight I am here to do my usual book reviews. This week's books were both books that I mainly grabbed on a whim in a hurry last week.  Both have a plethora of patterns, and both seem very retro-esque as well.


Likes: 
Each pattern has photos to show how your hands should look as you make certain stitches and sections of your project.
The patterns are extremely well written and detailed.
The book has a retro flare to it considering the date it was published. (published 2006).
Not just sweaters
There is a section about dying in the back!

Dislikes:
The retro flare, some of these patterns are just really cheesy and flashy.
As helpful as the photos are, they get a bit busy after a while.

Favorite patterns:

Disco Set

Overall, a lot of these patterns are flashy, gaudy and just not me. The instructions are great, I just wish the patterns matched.

Speed Knitting by Kris Percival

Likes: 
The simple fact that the patterns are designed to be knitted fast.
Instructions on how to pick the perfect yarn and needles.
The appendix in the back has good visual instructions for learning basics.
Colorful photos and layout
The baby patterns are super cute!

Dislikes: 
I don't really have any.

Favorite Patterns:

Overall, this book has a lot of things I would gladly make if I needed a quick and easy pattern. Definitely on my list of books I want!

In non-review news, I decided to do the Ravellenic Games, which I will post about tomorrow or Monday. I am pretty excited that I am doing it, let alone that I have time to do it! I joined the "There's Cat Hair in my Knitting!" group, which will be a fun adventure once it gets going :)

Happy Weekend everyone!

~Lisa

Wednesday, July 25, 2012

WIP Wednesday: Happy Sock Day :)

Happy Wednesday folks! For me it's "sock day" because the only things I have to post about are socks.

My only WIP that I am continuously working on is my Un-Vanilla Socks, which actually need a name change now.

This was the yarn:


My full intentions were to make these plain old vanilla toe up socks, just because the color is so wild and I wanted something super basic. Well.... as I worked the toe I realized that the color is much more subtle when you knit with it so I decided to pick out a pattern from my copy of Socks from the Toe Up (Which is a fantastic book!). This decision did not come easily but I finally decided on Lacy Rib Socks because the pattern was subtle and simple enough to work with this yarn. It's slower going than Vanilla, but they are coming along nicely!


It's so funny, because I can get bored with knitting, bored to the point where I just stop for awhile, but then I pick up or start a pair of socks and I'm happy again! There is just something about socks that remind me how much I love knitting.

In related sock news, I have some new yarn to share with you all. One of them is yet another skein of sock yarn! This time blame my aunt, who brought it back for me from Germany (I am taking a solumn vow to not buy anymore yarn all summer, but gifts are fine :P ).


My aunt knows me well (or is a good guesser) because I don't have a single skein of any blue-type sock yarns in my stash! This is so squishy too! Yay more socks!


She also knows I look good in blues, which led to these 5 skeins of Merino! YAY! I seriously plan to knit a sweater this fall with these, perfect for a bounce back from the epic lace top failure.

So, how is the week going? I hope it's going well! Mine is fast and short, as I am going home to hold a garage sale Friday and Saturday for Relay! Have a good one guys.

And as usual, check out Tami's Amis for more WIP Wednesdays. 

~Lisa


P.S.-- Guess who's going to see The Amazing Spider-man for the 3rd time tomorrow? Forget about a yarn budget, I think I need a Spide-rman budget!

Monday, July 23, 2012

MIY Monday: College Student Solutions

Sorry this is so late. Lately I haven't even been motivated to update my blog, even though there are so many things I could share with you all. I also haven't felt up to MIY Mondays the way I was when I started. But I wanted to share this with you guys anyways, so here goes.


My MIY Mondays's Mission is share creative, innovative, fun and (hopefully) cheap ideas and projects for you home and life, as well as healthy and (hopefully) cheaper alternatives to everyday cooking, shopping and eating out. I hope you will join in my on my mission!


Today I wanted to share with you a few solutions to some problems I had when I moved into my new apartment. All of these were relatively cheap solutions (for me) because I either had the items already on hand or they were very cheap to purchase.


Problem 1: The only outlet close to my bed was on the other side of the door.


 Solution? Tape DID NOT want to stay, believe me, I tried masking, packaging, painters and scotch. No luck! Then I saw the massive pile of Command Hooks (I have a love affair with these things!) that I have collected over the past couple years.  The great thing about these is that you can remove them easily and keep the hook after you move, so all you need to replace is the sticky strip. The genius inside me decided to put them on the ceiling and hang the extension cord from them. Worked like a charm! I also have this happening in my living room with my modem so I can get internet on my Blu Ray Player!


Problem 2: There were no curtains and curtains are super expensive, even at Walmart.

Solution? The fabric aisle! I was able to get 4 yards of fabric (enough for 5 windows) for under $10! Take the fabric, cut it down (if you are perfectionist, do it neater than I did!) and use thumb tacks or nails to cover the windows. Problem solved! And so much cheaper than curtains (and you get the exact size and color you need!)


Problem #3: The walls are boring!

Solution? The cure for boring walls are endless! If you happen to be an art student like me, then the solution is easy, use your own art! The walls around my T.V. are high school art, and the walls by my futon are college art (left - spindle drawings, done specifically for that wall, right - painting I did in class). 

There is no greater feeling than seeing your own art on display in your own house!


Problem #4: The futon seat is really short with the back up, making it uncomfortable. 

Solution? Disreguard the mess on my futon, but the solution is to use pillows, in this case the armed kind that me and my roommates bought last year, to create your own back, so that you can lay the futon flat and make more room for your butt. And if it's still uncomfortable, a blanket or two should solve that problem!

Placing it against the corner gives me even more foot room!

Problem #5: As an art student, you want to be able to hang up your work and step back, without using tape (can tear the paper) or putting holes all over the wall (can make landlord mad!)

Solution? Ok so yes, there are still holes in the wall where I hung these, but far less if I didn't put them up at all. I was able to get all of the below cork boards from the thrift store for $1.50 each, far cheaper than buying rolls of cork from the office store. Upon hanging them up, I decided to prime them white so that if I use transparent paper I can get an idea what they'd look like and also so bits of cork are less likely to fall off when used. I really like the fact that I have a wall to hang my work for examining on!


That's all I have to share for MIY Monday, but before I go I want to share a recent painting I completed. I decided to experiment more with the knitting artwork, using a different surface and applying paint and gels. The surface on this is a cheap canvas panel, 8 by 8 inches, I had laying around. I don't use these in my classes because they are cheap and non-professional, but I decided to try it for fun. I really like the colors and results. I CANNOT wait to get back in the studio when school starts! I have so many ideas!

Goal: Make the balls blend in with surroundings. Pretty sure that's been achieved? What do you think?

Have a DIY or MIY Blog post you want to share? It doesn't even have to be on a Monday. Add your linky below, I'd love to see what you are up to!


And I am going to leave you all with a Photo of Sasha being silly!

~Lisa
She used to play in this tent as a kitten and we got it out this weekend and she somehow still fits and was having a blast! I will post a video when I have more time. Goodnight guys!

Sunday, July 22, 2012

Saturday Evening Book Review - and a movie too!

Sorry this is late guys, I had a bit of an adventure last night and didn't think to post this before it started. I still wanted to share this with you all anyways, so I am just posting a day late.

Knit Fix by Lisa Kartus

Likes:
Solutions to pretty much every problem you will likely encounter when knitting basic patterns.
The author talks about where she started and how she came to write this book.
There are a bunch of techniques in this book I never knew before reading this.
The visuals on how to do things are really helpful.
The way the book is divided up really helps you find what exactly you are looking for.

Dislikes:
A few of the instructions are a bit vague

Favorite Patterns:
There are not patterns, this is just a help book.

Overall, I like this book a lot and it will very likely be added to my library soon. Although everything in this book can be found elsewhere (internet, other books) it's nice to have it all in one place to just reach for when needed.

Stashbuster Knits by Melissa Leapman

Likes:
The detailed section about how to sort, arrange, and store you stash.
The patterns are divided by yarn weight.
She offers different suggested color combos in case you don't like the original
There is a section all about picking colors.
Patterns are varied from using full skeins to scraps -- she is accommodating for everything!

Dislikes: 
I wish that they weren't all colorwork, but then again, using scraps and stash yarns will usually mean doing colorwork patterns. 
I almost wish there were MORE patterns.

Favorite Patterns:

Overall, I like Melissa as an author, her patterns are always pretty cool and fun, and I think there are quite a few things I'd make in this book but I don't have the stash big enough to make many of these yet. So what's the point of doing stashbuster projects if you have to increase your stash to do so. 

So last night's adventure involved going to a local drive - in that just reopened a few years ago. They were playing a double feature of Ice Age: Continental Drift and The Amazing Spiderman (which I have already seen). 


I went home this weekend to sort through things for my garage sale next weekend and I heard they were doing these 2 movies. I saw the Amazing Spiderman last weekend and LOVED it so I wanted an excuse to see it again anyways. The Ice Age movie was an added bonus (I like those movies pretty good). 


So I wanted to share a quick review of The Amazing Spiderman. I really liked the first trilogy when I came out originally, but as time has gone I have lost my interest in that series. When I heard they were rebooting I wasn't sure how to feel, like most people; It had only been a few years! But as the previews came, and the images came and it got closer, I knew I wanted to see this movie. So I went with a friend last weekend and FELL IN LOVE! Andrew Garfield is a very convincing awkward teenager and Emma Stone has such great chemistry with him. The story is a million times better than the first of the other series and the idea of focusing more on Peter trying to figure out who he is and what happened to his parents really works. I almost feel like the bad guy  is a side story to the real story going on. 

So now I've seen it twice. I really want to see it in 3-D, even though I am not a huge 3-D fan (too expensive) but I think I am slowly becoming one because they are finally starting to make 3-D movies better. I think seeing this movie in 3-D would be an amazing experience. But my budget doesn't allow for it. Oh well. I can't wait for this movie to come out!

As for Ice Age: It was really good too! Of all the animated series, thy always seem to make these movies pretty good. You can tell it's running dry, but it was still pretty good movie. 


What did you guys do this weekend? I hope everyone is having a great one. Being at home is sure nice sometimes! 

Happy Sunday!

~Lisa

Wednesday, July 18, 2012

Resolutions-in-Progress Wednesday

Happy Wednesday! I'm halfway through the week and the weekend cannot come soon enough!

For today's WIP Wednesday, I thought I would mix it up a bit. I have so much going on in fiber land that I think it's appropriate to take today's post and talk about my 2012 Fiber Resolutions.

Back at the beginning of the year me and Ivy both made lists of things we wanted to accomplish with our knitting and spinning this year (her list). While she has amazingly been trucking through her list, I felt the last few months that I had kind of just forgotten about mine.

And then something happened: I looked at the list and realized I was a lot farther than I thought, and that all the ones I really care about doing are actually happening.

Resolution-in-progress #1: Conquer something lace with minimal, barely noticeable mistakes. Like socks or a scarf or something smaller.


Or bigger, like a top. I wish I could say I had conquered it though. This is the depressing part of the post. So if you tear up easily you may want to look away. 

Remember this: 

Well I haven't picked it up in forever, so I decided to last night. After knitting another 4 rounds it was finally getting to a good length where I could tell if it was going to fit or not. The whole time I was worried it'd be too small.


WOW! My math is bad! I am never, ever, ever again following instructions to make your own numbers. At least, not for a very long time. Basically, I am at that point where I want to cry, long and hard, over the many many hours spent just getting this far. Safe to say this will be in hibernation for a very long time until I can pull it out and start over without ripping my heart out as well.

But, it still helps fulfill the above goal, in that the lace is almost perfect (Thanks to the markers) and if nothing else I learned a lot about knitting lace patterns in the process. 

Resolution-in-progress #2: Toe-Up 2 at a time socks. 

I couldn't resist casting on this yarn, it was just calling to me. 


Plus, I haven't knit a pair of plain vanilla socks in forever. So.... my new knit-night exclusive is a vanilla pattern from "Socks from the Toe-up" by Wendy Johnson, which I am knitting 2-at-a-time just to see how it goes. So far so good. 


So after these socks are done, this resolution will be also!

Resolution-in-progress DONE! #3: Dye bare yarn. So far I've only dyed roving, but I'd love to try dying sock yarn or something white like that.

A few weeks ago we had a dying/unpacking/fiber fun weekend at my place and Ivy graciously let me try dying some bare Knitpicks Stroll Fingering. I had never dyed bare yarn before, so I wasn't sure if it would be anything like dying bare roving or not. I basically did the same thing I do when I dye roving, and I gotta admit, the results were spectacular for a first time!


This yarn will eventually become a Multnomah Shawl, which I had planned on casting on much sooner, but right now it's on the back burner since I'm burned out on constant knitting AND I have so many other WIP's. 

Resolution-in-progress Complete! #4: Attempt different types of plys. I am not sure if you can do much more with a spindle, but even more 3 and 4 ply yarns would be nice.

And now for the big Tour de Fleece reveal! I gotta say, this yarn pretty much speaks for itself.

50% Tencel, 50% Merino, 4 oz, ~110 yards, two 2-ply yarns spun together to make a 4-ply chain yarn.

I seriously think I am the proudest of this yarn than any others I've spun.  It's the most even, and I managed to keep the fluff and softness, and it's enough to make something! I am sooo happy! (and I am taking photos outside from now on, period!)

Well,considering that I thought my resolutions list was going no where, it looks like I really do want to learn and that I am having a more successful year than I intially thought.

Have a great week guys!

To see more WIP Wednesdays, check out Tami's Amis!

~Lisa


Monday, July 16, 2012

MIY Monday #3: Healthy Breakfast Ideas

Good Morning! I am posting this earlier today so that everyone who wants to join has a chance to add their blog to my linky.

I hope you all had a great weekend, I had a pretty good one. I got a lot of spinning and dying done that I can't wait to share later this week. But for now, MIY Monday time!


My MIY Mondays's Mission is share creative, innovative, fun and (hopefully) cheap ideas and projects for you home and life, as well as healthy and (hopefully) cheaper alternatives to everyday cooking, shopping and eating out. I hope you will join in my on my mission!


Today I am going to share with you some healthier ideas for things you would normally buy at the store for breakfast.  Starting with my yogurt.

I absolutely love Greek Yogurt. It's healthier and has more protein than normal yogurt and there is something about it that I just love.  I have (and still do depending on price/budget) been buying the Yoplait Strawberry kind, but it isn't the healthiest kind you can get.  I've actually heard the best options are Fage and Chobani -- but those are out of my price range.  

So I wanted to try and get away from all the added sugar of the Yoplait fruited yogurt.  I was at Dillons in the dairy aisle when I remembered the berries I had bought at Aldis and decided to try just mixing them into plain Vanilla Greek Yogurt (I wasn't sure if I would like Plain flavor, so I went with Vanilla because I knew I'd like that). 


Homemade Fruited Greek Yogurt!

Ingredients:
Tub of Greek Yogurt, either in Vanilla or Plain 
Fruits of choice. I used strawberries and blackberries, but you could probably use anything.
Container(s) to put yogurt in (I made ind. portions by putting them in little cups)
Sugar (optional).


The first thing I did was divide my yogurt into my cups. I had these 'child size' juice cups in my cabinet that were from my Grandma's house that I adopted and they are perfect for ind yogurt cups!


So next I cut up my berries. I didn't even need the whole tub of either to completely fill the cups, just an FYI if you try this. I also discovered, after mixing, that I probably should have put the fruit in first and then the yogurt, to get the fruit more evenly covered. Maybe next time. Also, if you want to add sugar/honey/any other flavorings, now is a good time.


Mix the yogurt and fruit in each cup (or if you wanted you could even mix IN the original yogurt tub, then divide, or not divide at all. It's really up to you) and then cover with lids/cellophane. Keep in the fridge until ready for breakfast! 


Another thing I discovered was that they tasted better the longer they had to sit in the fridge.  The last one I ate over a week later was probably the best because the berries had a chance to juice up a bit and mix the flavor more with the yogurt. 

Serving suggestion: Yogurt with buttered toast, oatmeal, banana and orange juice!

If I do this again, I will let them sit longer before eating and maybe try plain, or just a different brand, of yogurt. The Kroger brand wasn't as thick as I liked and (maybe because it was vanilla) tasted a bit weird with the fruit. 

Also, for those interested, these 6 cups totaled about $7 when I did the math, and even then that is because I got my fruit cheaper at Aldi. So is this a cheaper option to the pre-mixed cartons? It depends on the brand you buy. Is it healthier than the cartons? Very much so, yes.

I really want to share another quick breakfast recipe with you, even though I don't have any photos of it. I haven't done this in awhile, mostly because I cannot seem to perfect it, but it's a nice substitute to the super sugary instant oatmeal out there.

Buy a can of the basic instant oatmeal. Pour the amount for a single serving into a bowl.  Add desired amount of sugar. Next add your other ingredients. In my case, this was cinnamon.  Here's where the issue came. I could never figure out how to get enough cinnamon/sugar into the mix to make it taste good without overpowering it with sugar. Some days it would be fine, others it would be nasty. Finally, add water or milk and follow directions for cooking.  If you want to do this with fruit, you should probably add that after it's cooked. 

Overall, if you can get it tasting right, this is healthier (less sugar!) than instant oatmeal packets and also cheaper per serving (8 packets in a box compared to about 10-12 servings in a can).

Anybody have anything they LOVE to add to their yogurt or oatmeal? I'd love to hear, I'm always looking for new ideas!

And, if you want to join in, fill out Mr. Linky below :) 

Happy Monday!

~Lisa