Showing posts with label MIY Monday. Show all posts

Monday, September 10, 2012

MIY Monday: Improv College Food Solutions

Hi guys, I hope the weekend treated you all well. I know it sure did for me! I spent most of Saturday hanging out with my sttbf (gosh I love calling him that!). We hiked the Konza Prairie, during which we had an amazing discussion of pretty much everything and then ended up taking a study break followed by quick dinner. The more I hang out with him, the more I see him as a great friend that I am enjoying getting to know! Hopefully more will come from it though, when he is ready!

Anyways, I wanted to do a MIY Monday post, since I missed last week. I had a couple ideas, but forgot to get photos, so today's post is all about the improvising things I tend to do in the kitchen.


First off I wanted to share with you my morning  breakfast.  I LOVE scrambled eggs, and they give me such protein, but I never really had the time or will power to turn on the skillet every morning. Then I remembered something my mom tried once, which is making them in the microwave!

Before
After
Stir together 2 eggs with some milk (really doesn't matter how much) and pop into the microwave for 1 min, being sure to cover in case of explosions (learned that the hard way).  After 1 min, stir and cook for anywhere from another 30 sec to 1 min.  You want to make sure you get your eggs all the way done. If you it's going to take more than another 1 min, than do it in 30 sec increments so you don't end up with egg explosions.  After that, remove from the microwave and enjoy.  

I do this pretty much every morning, because it's so much easier, and not as messy as, using the stove top! And so far it hasn't let me down.  

Something else I tried a couple of weeks ago that I would likely try again is a quick and healthy pasta dinner.  I didn't know what to make and didn't want a full on weeks worth of meals, so I grabbed my left over box of spaghetti from the soup I made a few weeks ago and decided to boil it and add broccoli, olive oil and seasonings.
 Then I remembered that I had leftover tomatoes from my taco night that I would never eat (I hate raw tomatoes) so I put those in the skillet and let them cook and boil down a bit.  

I then added everything together and ta da! Quick and healthy pasta! I still have some more tomatoes (if they are still good) as well as pesto sauce and chicken breasts, so I may do that for this weeks meal. 

Those are 2 of the many improvisations I have been making around my tiny little kitchen lately. I hope you enjoyed hearing about my adventures.  Is there anything you guys like to make in your kitchen you don't have an official recipe for? Improv meals are some of my favorites!

If you want to join in MIY Monday, feel free to take a banner and link below.

~Lisa

Monday, August 27, 2012

MIY Monday - Quickie Wall Decor

Hi guys! Sorry I didn't post a book review on Saturday, but it was a very busy day and I just didn't feel like it. Do you ever feel that way? Like you just don't wanna blog anymore for awhile? Maybe it's the amount of school work I keep putting off to do other things, like hang out with my friends. I have done that WAY too much lately....

Anyways, for MIY Monday I wanted to share with you something I did in a bit of a hurry last weekend, but I still think turned out great. I have a flat wall above my bed that is a bit lower than the rest of the ceiling, so I decided it needed SOMETHING! I just haven't been able to decide what. I finally settled on doing something based on the seasons.  Since it is basically fall, I started there.

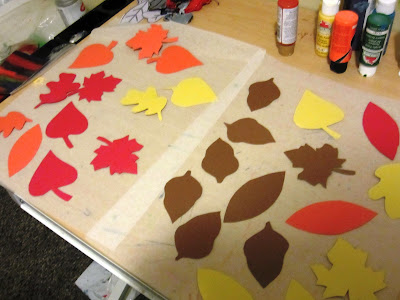
I started with the basics: Construction paper and print outs of leaves from Microsoft Word Clipart (best resource ever!)

After cutting out the leaves, I traced them onto my paper, fitting as many as I could on one sheet, and then proceeded to cut those out as well. This part took a bit of work. 

I was originally going to just leave them as shown above, but then I remembered the craft paint I had and decided to spice them up a bit. 

I went in with my brush and paint and just did a few textures here and there to make them pretty. After letting them dry, I put tape on the back and randomly put them on the ceiling above my bed. Now it's fall up there! I can wait for winter so I can do homemade paper snowflakes!


School is picking up and I am not sure if I like it yet. Being a senior really isn't all it's cracked up to be :/

Happy Monday guys, and if you want to join in, feel free to link and take my banner!


~Lisa


Monday, August 20, 2012

MIY Monday: Homemade Pesto!

My MIY Mondays's Mission is share creative, innovative, fun and (hopefully) cheap ideas and projects for you home and life, as well as healthy and (hopefully) cheaper alternatives to everyday cooking, shopping and eating out. I hope you will join in my on my mission!


About a month ago me and my aunt harvested a huge batch of basil from her garden. As she promised, we then decided to make homemade pesto! And believe me, this stuff is amazing!

Recipe:

1 Cup of pine nuts (but you can also use cashews, walnuts, etc...google it!)
4 cups of fresh basil, firmly packed
2 cloves of crushed garlic
1 cup grated parmesan cheese
1 cup plus 1 tablespoon olive oil

The first thing we had to do was get all the leaves off the basil stems, which took quite a long time to do actually! She had SO much of it!


While we were doing this, the pine nuts were roasting in the oven and 450 degrees. With careful watching, they were taken out once they turned lightly brown. 


 Next came the garlic, which we peeled and crushed before moving onto the blender!

My aunt even has a fancy crusher!


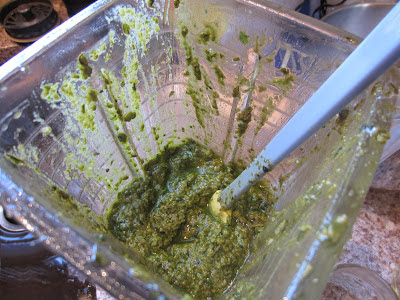
Putting the basil, garlic and pine nuts into the blender (or if you have one, food processor), we then pureed everything until it was smooth.  The end result looked like baby food! 


This is where the magic happens. Using freshly parmesan cheese makes it taste so amazing! So guess who got to use the fancy grater? Tee hee :)


 Also according to my aunt, the kind of olive oil you use actually affects the flavor. I never really thought of that, but then again, I don't buy olive oil too often.  So we ended up using the one on the left, which was organic, extra virgin.


Olive oil and cheese in blender, we set to work mixing it all together! 


After it was all combined we tasted and then added a bit more basil, tasted again and added more garlic, tasted again and added more oil. Long story short, the recipe is just a basic guideline. It really is about preference. I loved the end result, but according to my aunt, she's done better. She very much thinks it is the type of oil we used that affected the flavor. 


Upon getting the recipe the way we liked, the pesto was divided into mini jars to be frozen until further use. I still have 5 of the 6 in my freezer, waiting for the perfect pasta night! What I was worried about was that these little jars wouldn't serve very much each, but after using one of them, I learned that the flavor goes a very long ways. 


Wanna join MIY Mondays? Just add your link below and take a banner if you want!

Want an idea for something to eat with your pesto? Check out my other blog, Lisa's Tiny Kitchen, for a chicken parm recipe!


~Lisa


Monday, August 13, 2012

MIY Monday: T-Shirt Recyling

Happy Monday all. In exactly one week I will be returning to classes! Yikes! But in the mean time, I want to share a quick crafty thing I did this weekend for my MIY Monday.


My MIY Mondays's Mission is share creative, innovative, fun and (hopefully) cheap ideas and projects for you home and life, as well as healthy and (hopefully) cheaper alternatives to everyday cooking, shopping and eating out. I hope you will join in my on my mission!

This past Friday I was thinking about how I had some old Relay For Life shirts I would never wear, since they were faded an no longer my size. A guy I work with had turned some old shirts into wall art, so I figured why not try it?

He told me he had used styrofoam and glue, and as much as that idea appealed to me, I couldn't bring myself to actually glue the shirts down.... and I didn't have any styrofoam or foamcore laying around, nor did I have the funds to go buy any.  So I settled for the box to my new TV. Not as archival (won't last as long) but will do for now.


Upon deliberation, I settled on a size that would fit all four of the shirts (16 by 14) and went to work with my amazing box cutter knife. They didn't turn out completely straight, but the bulkyness of the shirts hides that fact.


For the first shirt, I decided to cut it up and wrap it around the cardboard. It worked out ok, except the shirt is thin enough to see a bit of brown underneath and I also cut it a bit off.


If I didn't want to use glue, than what should I use? That was a very tough question, finally settled with packaging tape. Like I said before, this was definitely more of a temporary solution until I have more funds. I wrapped the cut shirt around a piece of cardboard and taped it down with LOTS of packaging tape. :)

Shirt 1

As you can see below, after doing the first I realized that I shouldn't cut the shirts up, just fold the whole thing around the cardboard. This prevents the cardboard from showing through and also allows me to remove them later if I decide to do something else.

Shirt 2

Upon completion of all folding, I attached a smaller piece of cardboard to the back to keep the shirt tight and secure (no photo...) and then moved on to the next one. Below are all four shirts. Overall, I am happy with what results; They don't really look that bad, and are going to be easy to take apart if I decide I want to re-do them more permanently.


So how do you hang these? That is a good question even I don't have an answer to, as they are still sitting on my floor. I tried to attach a panel of cardboard with fishing line and hang from hooks, but after attempting to hang them, they just fell off, the fishing line coming undone. I am thinking this is a job for those amazing Command picture hanging strips, but I am out right now. So when I get to the store next I shall pick some up and share with you my t-shirt wall. 

Hanging Device? Fail

I really do think when I have a bit of extra money I will try to make these more legit and permanent, such as this.

On the knitting front this week, I have 3-4 projects on the needles right now, but most will be off by the end of the week, as they are for designs I am writing up. I think I am going to submit my hat to Knitty, so wish me luck!

Want to join in MIY Mondays? Take the banner and post your site here, even if it isn't on a Monday, any DIY post will work :) Also, if I come across any DIY blogs, I may link them back here. I hope that's ok with the writers!

~Lisa

YES!

Monday, August 6, 2012

MIY Monday AND a New Blog!

Happy Monday everyone! Today's MIY Monday may seem a bit disoriented, but that's because I really didn't know what to talk about! I did THREE different cooking endeavors since last Monday, I just can't share them with you here! Why you ask? Because I have a new cooking blog just waiting for posts! 

Introducing:


Since I have been doing so many cooking experiments in my new apartment, way more than enough to just post on Mondays, I have decided to start a new cooking blog. I will likely not update it as frequently as this one, but I needed an excuse to share my cooking adventures. Head on over for a look at some Salsa I made last weekend :)

Back to this blog and MIY Mondays!


My MIY Mondays's Mission is share creative, innovative, fun and (hopefully) cheap ideas and projects for you home and life, as well as healthy and (hopefully) cheaper alternatives to everyday cooking, shopping and eating out. I hope you will join in my on my mission!

Today's post is all about the gadgets I keep in my kitchen that allow me to make homemade snacks and meals more quickly and affordable.

First up is my Poplite Air Popper, the greatest invention ever in my opinion.  This thing is seriously a dieter's best friend! All you do is add your plain old popcorn seeds, plug it in, and the hot air pops the corn. NO OIL! That's the best part, and the fact that it takes as long as a microwave and you don't have all the added butter. By using this machine, I am able to get a bowl of low-cal, great tasting popcorn that I can then top with whatever I want. So far I've tried Nutella and also Honey. What do you like on your popcorn?


Machine price: $20-$30 depending on brand and store; Corn cost: about $3 for a large bag of store brand.

Next up on my list of wacky gadgets is this thing my Mom bought on a whim for $5 at Sears. It claims that it will make potato chips in the microwave. When we first bought we didn't think it would actually work.


The concept is basically this: Use the slicer shown above to slice super thin potato slices, then place them on the rack below. Put the rack in the microwave for 4-5 min and then you have oil-less, un-fryed potato chips! Does it work??? I didn't think it would, but guess what? It does! And the chips are amazing. The only downfall is you only get 24 at a time. 


Finally, I have this super cute microwave steamer pot my mom got me at a Pampered Chef party. I LOVE this thing! It allows me to make steamed veggies in under 5 minutes. Frozen or fresh, this thing is magical.  :)


So. What gadgets can you guys all not live without? I know I love the above three that's for sure :)

If you want to participate, feel free to leave your linky and take the button!

~Lisa


Monday, July 30, 2012

MIY Monday: Adding a Touch of Love to Your Herb Garden.

Good morning! This is an early post for me today so that if anyone is interested they can participate in my MIY Mondays!

I had a very successful weekend, including lots of knitting time, which will be talked about tomorrow, but for today I want to share with you a craft idea I had for a very close friend of mine.


As always: My MIY Mondays's Mission is share creative, innovative, fun and (hopefully) cheap ideas and projects for you home and life, as well as healthy and (hopefully) cheaper alternatives to everyday cooking, shopping and eating out. I hope you will join in my on my mission!

So my great friend Ivy (Pumpkin Spins) is about to embark on a new journey in her life, Grad School! And she is moving into a brand new city and apartment. She had mentioned she wanted to start an indoor herb garden, and after receiving an amazing wooden cutting board from her as a housewarming gift, I knew I had to give her something equally as special.  Me being an artist, I decided to try painting some ceramic pots to grow herbs in.


All that was really needed for this project were ceramic pots (depending on size, under a couple bucks at Home Depot), Acrylic varnish/sealer for the insides, and acrylic paint (I used paint specifically for ceramics, but any will do) for the outside.

After researching a bit about how to paint pots, I went at it. I started by applying the varnish to the inside so that, when the plants and dirt are added, no water can seep through and ruin my hard work. I personally applied 3 coats, but more is always better! Also Acrylic varnish is what I used, but oil would also work.

The next step is the fun one: Getting to paint! I didn't want pencil marks everywhere so I sketched these out on paper first and then decided on a final idea.

One thing I love about acrylics opposed to oils is that they dry fast, so fast that smooth blending is usually not an option.  In the case of these pots, that was perfect. Being able to layer colors and values without worrying about them mixing was so refreshing and really led well to the overall feel of the images.

Another thing I liked was that I had decided to apply black 'outlines' to parts on the images, which helped with the graphic nature of the pots, which is what I was going for. I like the whimsical, cartoonish feel that I was able to get. The type of paint I used really helped too. Found in the aisle with the other cheap craft paints, this was designed specifically for ceramics and outdoors, which made thicker and more vibrant against the orange of the pot.


After letting them dry overnight, I packed them up super well and shipped them off to my friend. A day later I received the most amazing text about how much she really, truly, LOVES these pots! There is no greater feeling than knowing that a gift is appreciated, especially a hand made one.

My aunt loved them too (she helped me pack them up) and seems to think that I should sell more at Farmer's Market? They only took about an hour each to make, what do you all think? Would it be worth it?

I hope everyone had a fabulous weekend like me! I had so much fun and so much success this weekend, I just didn't want it to end!

~Lisa

Wanna participate? Fill out Mr. Linky and feel free to use my banner above!