Showing posts with label cooking. Show all posts

Wednesday, April 6, 2016

Everything but Knitting

As much as knitting is a part of my life, I feel like I have barely had time to knit lately, let alone breathe...


Don't get me wrong, good things are happening, and many of them are artsy/crafty.  Knitting just isn't one of them.


For example, I unearthed a stack of greeting cards that wasn't on my shop already.  Instead of just listing them alone, I decided I wanted to make markers to match. Thus these cool sets were born. Now on Etsy, $10 gets you five markers and a matching card. 


Maybe it's been all the painting that has been happening.  With a group show opening this week, I knew I wanted to finish my current painting in time. AND I DID! Barely, but I did. It's 40 x 32 and I honestly can't remember what I titled it right now...

It's a single tree overlooking the water. Can you tell? 

I did get some spinning done this weekend.  Does that count towards knitting? I finally have all my yarn spun for what I hope to be a zickzack scarf.


I've also been busy trying to practice good food habits. I found a local farm that does produce baskets by the week and was able to acquire this last week.  It has so many wonderful things in it for a very low cost. 


One of the things was a beet, which I don't really have experience with.  I decided to roast it with some sweet potato.  Paired with orange pork chops and orange quinoa, it turned out amazing!


Weekly Inspirations:

Knitting:  I discovered this designer today, Casapinka, and I love her use of lace and color. I really do want to knit them all! My favorite right now is Kitty Invisibility Cloak.
Art: The new artists have moved into the Horlock House (my old residency).  I'm so excited that one is a fiber artist!
Food: Besides the above, I also made green onion pancakes with the massive bunch in my basket.  I had never even heard of them until I did a google search, and all they are is flour and water, but man they are good! 
Life: I am starting to pull some night shifts at my job, which is great.  But that means less me time, which is not great.  How is that inspiring? I'll let you know when I find out.

Have a wonderful week!

~Lisa


Tuesday, March 19, 2013

Feeling Foodie

Not having school yesterday and today (and the rest of the week) has really allowed me to explore my creativity in the kitchen. Ever since I learned about "whole foods" and making it my self, I have been experimenting in my tiny apartment kitchen! The possibilities really are endless when you know what you want to achieve :) And you when you don't make your dinner from a box. 

The first thing I have been experimenting with snacks.  Although I am not 100% whole foods, snacks are always an issue for me.  The majority of my options are always sugar filled (and many are labeled as "healthy"...) or fat filled. And then I'm hungry again later.  I started to solve this problem a couple weeks ago with my trail mix, and this week decided to go a step further. 

If you haven't heard of Larabars, you are missing out. These amazing snack bars are mostly dried fruit and nuts, chopped and pressed into bars. And man are they good! Ivy introduced me to them over winter break and I finally broke down and bought a food processor so that I could make my own.  This week's batch consists of prunes, raisins, almonds, pumpkin seeds and dark chocolate.  Putting it all in the chopper allowed the nuts to stick to the fruit, and thus I was able to press them into bars! I can't wait to do more experimenting -- I really want to do something with dried pineapple and mangoes.


Lunch has been a bit of an issue lately too, simply for the fact that I don't think I'm eating a big enough/enough substance and then I get hungry really early in the afternoon. You're supposed to have 2/3 of your daily calories in the earlier part of the day so that they can be burned off. Well by having small lunches and snacking smaller, I end up with a huge dinner. 

This week I decided to mix up my usual salads, and googled pasta salad recipes. I stumbled upon this one, which sounded healthy and yummy! Today I decided to try it and man am I glad I did. I am NEVER going back to store-bought vinaigrette again. I omitted the mustard from this recipe, but I still love how it turned out. I added carrots I had in the fridge, and used a different pasta. 

The grapes add a nice touch, I am so excited to try more salad recipes in the weeks to come!

A couple weeks ago I was given a huge bag of mini red potatoes, along with lots of other veggies.  I've been wanting to try baked wedges/fries for awhile, and now I had the chance. So I cut up so potatoes and drenched them in olive oil, seasons, and parmesan cheese. This was the starting point, although I added extra basil, oregano, etc. to make it more Italian. They are delectable!

I still cannot believe that I have only been a "foodie" for less than a year! At this time last year I was just beginning to cook myself, but never paying this much attention to the things I cooked with. I know one thing -- I am forever in love with olive oil and honey!  But seriously, cooking with whole and 1 ingredient foods really isn't that hard, or much more expensive. If budgeted correctly, it can be done. Why do food companies think they can get away with so much crap? 

I'm leaving you guys with an in-progress photo of my current painting, which is also my best one yet. I spent 5 hrs at studio today, and I plan to spend at least that tomorrow as well.


~Lisa


Sunday, March 3, 2013

Heart Healthy Snacking

I don't know if I've ever mentioned that I am becoming a bit of a whole foods person, but lately I have been very much into healthy, unprocessed eating. I still enjoy the occasional fast food meal (although those are becoming less and less with my shrinking paychecks...) and some things are just hard to avoid, but if I can get away with it I prefer the 'real' thing.

I think it really started with the corn syrup scare. Corn syrup is my number one foe right now, if I can avoid it I will. Soda has pretty much left the menu and so have many others. I really don't think I miss it too much either.

Then there are oils; canola and vegetable oils are the big ones. I feel like every label I read has these in them!   They are so hard to avoid!

And don't forget sugar. Process and refined sugar is probably the worst culprit right now for me. I gave up corn syrup the best I could, but normal sugar is just as hard. I try my best to eat more honey and fruit based sugars, but sometimes that doesn't always work.

Where am I going with this? Well the majority of my grocery cart is always fruits, veggies and un-processed items, but I have always had a problem with snacks.  Most snacking options are processed, sugary bars or crackers that do nothing but give me a stomach ache. I was doing Tricutts and organic crackers for a bit but boxes of those are pretty pricey as well. With my new, more active life style I've been wanting to get more protein and energy, but trail mixes are so expensive and always come with extra oils, sugar or preservatives that I don't want to spend my money on.

So today I caved. I went grocery shopping and along with my normal mix of veggies and ingredients for tacos this week I bought some bulk ingredients to make my own trail mix. And surprisingly  it wasn't as expensive as I thought! (Although still more than I probably should spend on a college kid's budget)

Raw Pumpkin seeds - 1/3 lb; $1.48. 

Dried Mango with a bit of sweetener - 1/2 lb; $1.97

Chunks of "energy carob" (seeds, honey, cereal, apricots, etc...) = 1/4 lb; $1.50

Raw almonds - .4 lb; $2.49
Raw pecans - 1/4lb; $2.21

I toasted my almonds, pecans and pumpkin seeds at 350 degrees for 8 minutes and that made them taste amazing without that added salt! Combine of the above, plus some raisins and you get an amazing snack mix!


I just hope I can divide it up to make enough for a couple weeks. I'm trying to justify paying that much for not so much food.

Have you tried any new recipes for healthy things? Any other healthy snack substitutes that won't break the bank? I'd love to know!

~Lisa

PS: These ingredients were all purchased in bulk at my local Dillons (a division of Kroger).

Saturday, February 2, 2013

Recipe Exchange: Blackbean and Spinach Burritos

It's Saturday. Yesterday was Friday. I didn't do anything productive (art wise) and I don't think I'm going to today either. I just need a break after spending 8 hours straight in studio on Thursday. I have done a bit more experimenting with the knitting/ink thing, but not enough to share for now. So today's post is about a new recipe I invented last week!

Last summer at the Smokey Hill River Festival I tried a black bean and spinach burrito, and fell in love. It was AMAZING! So since then I have been experimenting with my own. I did one last semester with black beans, rice and spinach all separate and it was pretty good and decided to do it again for last week's meal. 

This time I happened to have an extra can of both corn and Rotel in my cabinet from a salad experiment gone wrong and decided to add them in. The end results? Brilliant! I present to you: 

Mexican Rice and Bean Burritos. 

Ingredients:
1 can of black beans
1 can of Rotel tomatoes (I used the kind with cilantro, but any will probably work)
1 can of corn
1 package of Mexican Rice Mix (my favorite is Mathas (sp?) at Dillons. .99 cents for a package)
1 bunch or package of spinach, fresh.
Shredded cheese
1 can/package of Enchilada Sauce (optional). I used the powder that you add a can of tomato sauce to.
Optional other toppings for burritos.


Open cans of black beans, corn and Rotel, and drain.
Prepare rice as listed on package, and add the beans, corn and rotel to the pot. Let simmer as instructed.
While the rice is cooking, wash and chop spinach.
Prepare enchilada sauce (optional) according to label.
Once rice mixture is done, fill tortillas with mixture, cheese and spinach (and whatever else you are wanting).
Close tortillas and top with sauce and more cheese.
ENJOY!

The batch I made ended up producing about 8 burritos. The nice thing about this recipe is that mixing all those things together allowed for less pan usage and the flavors to blend well. I really liked how this turned out.

I also shared this idea with my mom, who decided to turn it into a casserole  She made the rice mixture, than topped it with chicken and cheese and put it in the over for a bit to melt the cheese. My whole family loved it!

I am starting to really enjoy the mission I am putting myself on to find cheap, simple, healthy, delicious meals and am so glad I stumbled upon this idea. Sometimes pouring random things from the cabinet is so much fun! Have you done so recently?

~Lisa

heeheehee


Friday, January 18, 2013

FO Friday: Feeling Blue?

Ok, so I'll admit, I could not think of a good title for this blog post at all. But that's besides the point.

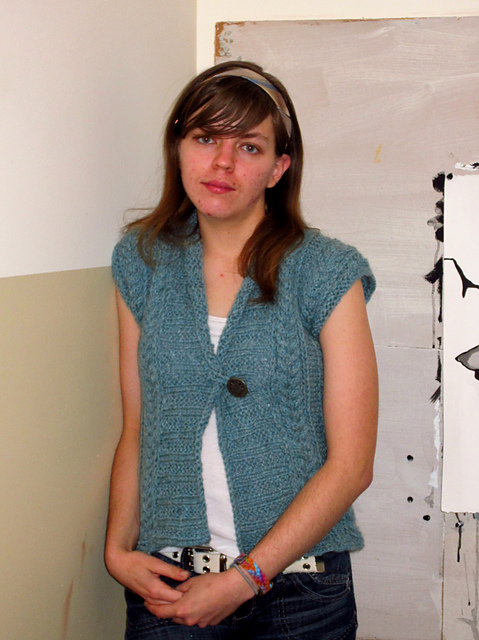
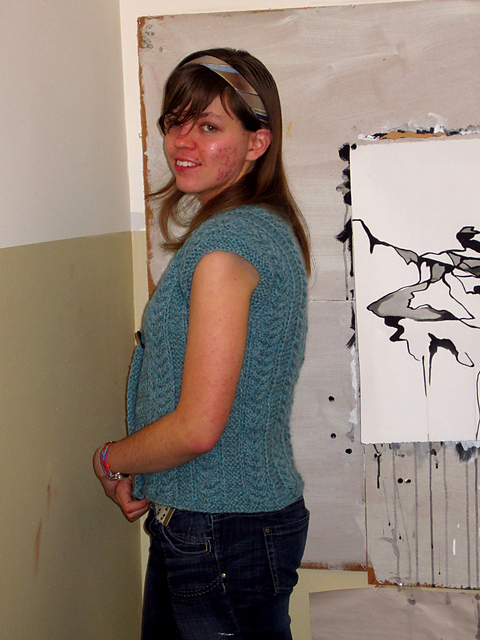
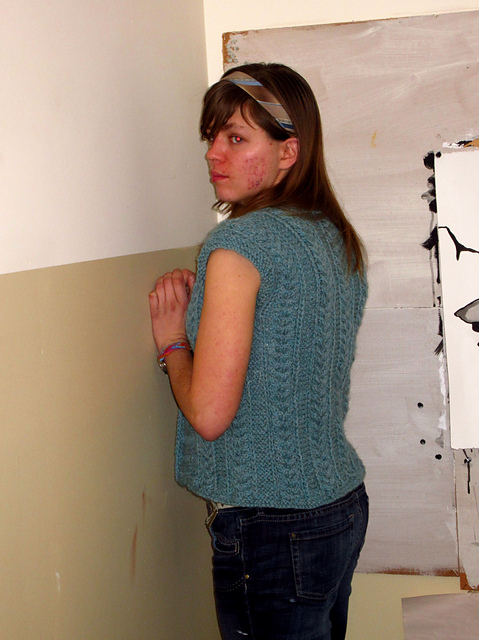
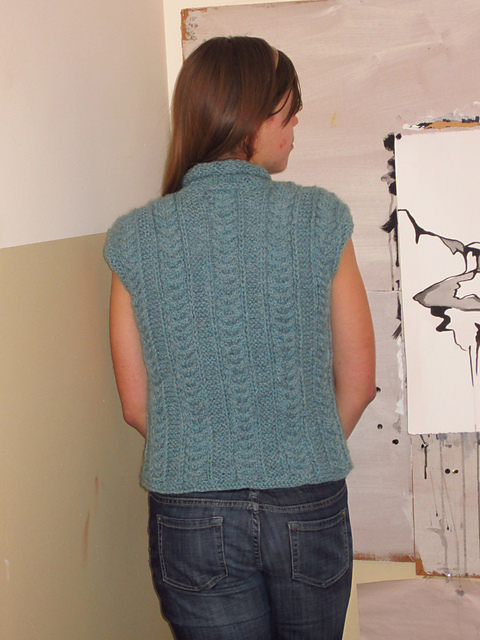
Since it's Friday, I want to share with you the vest that I finally finished. It's actually been 'done' since about January 2nd, but I didn't get the button and block it until yesterday, since I wanted to get the button from Wildflower. And so, without further ado, I present to you my Blue Eco Vest.


Knitted using Cascade Eco + yarn, the Eco vest was a fairly quick knit for me, something I will blame solely on 3 weeks of winter vacation with nothing to do but work and knit (and watch How I Met Your Mother on Netflix....). Trust me, if this was during the school year, it'd take a whole semester.


I didn't really find any problems with this pattern, something I'm really glad about, but I wish there was a better way to fasten the front. I LOVE the button I picked, it's pewter with a little flower, but I think it would work better with a button hole and not a crochet loop. I also should have moved it down a bit....


The cables did get a bit tedious after awhile, but that is part of the drive that kept me going, wanting to just get them done.  Overall, it was a quick, easy knit that I highly recommend to anyone wanting to branch into garments with minimal shaping and work involved.


In other news, I have started some cabled wrist warmers. They started as gloves, and then I decided I hated doing fingers, so changed my mind and decided to do wrist warmers to wear over a pair of store bought gloves (the one knit garment I don't mind buying...). I'm knitting them in Encore Worsted, the same yarn I made my headband out of. I was seriously going to just go basic, but I am a cable fanatic so one thing led to another and now they have cables. I may submit these somewhere, so I am just going to give you a peek at them for now.


In the world of non-knitted things, I baked my first homemade bread on Wednesday, using a recipe from the amazing cookbook Ivy gave me. I think one of the two loaves is underbaked, but I may be able to fix it later. For now, I am enjoying every bite of this honey wheat bread, and I may seriously switch from store bought to homebaked for awhile.


I hope everyone is ready for the weekend like I am. It's been a busy week and I'm ready for a break, even though the coming weeks involve school....

~Lisa

Don't forget Tami's Amis!

Wednesday, January 9, 2013

WIP Wednesday: Muffins and Wine

Happy Wednesday everyone! My week is speeding by, which means that I will be back to classes in no time. I guess that's good, right?

Before I get to the knitting, I wanted to share a recipe I found in the amazing cookbook Ivy gifted me.

The More-With-Less cookbook is all about eating better with more nutrition and less ingredients. Besides recipes, it has tip and tricks on many different subjects that I have been passionate about lately and after leafing through it I have found many, many recipes I cannot wait to make! And the one I HAD to try first? Whole Wheat Pineapple Muffins!


Whole Wheat Pineapple Muffins:
Preheat oven to 400
Sift together and set aside: 1 c flour, 1 c whole wheat flour, 3 tsp baking powder and 1/2 tsp salt.
Cream together: 1/4 c sugar and 1/4 cup margarine.
add: 1 egg and beat well.
stir in: 1 c undrained, crushed pineapple.
Add dry ingredients and stir until flour is moistened. 
Fill muffin tins 3/4 way full and bake 15-20 min (min took 16 minutes to bake). 
Serve hot (but they're good cold too!)

I really like these, the pineapple adds a nice bit of sweet to the overall very dense muffin, and the ingredients are super simple!

And now onto my sweater. With school being out, all I've been doing is working (I decided to stay home an extra week and go back next week to paint) and therefore I've had plenty of time to start on my wine-colored Dragonflies Pullover. So far it's going really well. The yarn is knitting up nicely (a bit splitty, but I can deal with that) and it's making a great, dense fabric. I can tell this is going to be the perfect sweater for colder days. 


I had a few glitches towards the beginning, when I couldn't figure out the chart. The pattern had mentioned short rows and wraps and turns and at that point I was really confused, so I ripped it out and tried something else. And then I figured it out and realized I had it right the first time, so I ripped it out again. I hate having to do that as much as the next knitter, but if it means a cute, CORRECT sweater, than so be it.  Now that I have it figured out, I am only 7 rows away from finishing the raglans and working on the body. I really hope to get this done in time to still wear it in the coming months, but with Kansas weather being so finicky lately, who really knows. 

I hope you are all enjoying your January, and that the week goes by smoothly. Until next time :)

~Lisa

For more WIP's, check out Tami's Amis!


Wednesday, October 10, 2012

WIP Wednesday...AND COOKIES!

Today's WIP Weds is short, sweet and too the point. Oh and mostly photos!

When you are an artist, your whole apartment is your studio. 
(Fig 2 and Drawing 3 Homework)

Literally, whole apartment. (Spindle drawings in progress)

And of course, you have to have a knitting corner!

My current studio room, occupied by my drawing homework. 

The single most amazing cookies EVER.

It's not a WIP but I really needed to share these with all of you. Lately I have been addicted to Pinterest, especially for the recipes. Well I have a whole board (Ways to Make Me Fat) and as Painting Society president it is my duty to provide sweets and experiment with recipes on them. So why not attempt something from said board? So last night I took a crack at Orange Dreamsicle Cookies and man are they amazing. 

A few tips:

Make sure you DO NOT press down the cookie dough. Also do not over bake, these are so much better soft.
I added a couple spoonfuls of Orange Juice to them also.
Understand that it's going to be a mess washing your grater after you zest your oranges. 

Anyways, these turned out so amazing! I had 3 in one sitting :/ 

Have a great week guys!

~Lisa

Don't forget to check out Tami's Amis!
Oh and if you want to follow me on Pinterest, click HERE!

Monday, July 2, 2012

MIY Monday #1. Better Than Pizza Hut!

Happy Monday friends! As I mentioned in yesterday's blog, I am going to start my own blog-along titled "Make it Yourself Mondays" or MIY Mondays. If you want to join just fill out the linky below so you can share what you have done. I also have a cute banner if you want it also.


My MIY Mondays's Mission is share creative, innovative, fun and (hopefully) cheap ideas and projects for you home and life, as well as healthy and (hopefully) cheaper alternatives to everyday cooking, shopping and eating out. I hope you will join in my on my mission!

So for my first ever MIY Monday I want to share with you this amazing pizza I had the experience of trying this weekend. Ivy, my blogging and letter buddy, came up for the weekend to help me move in and have some fiber fun. Along with that, we decided we wanted to cook a homemade dinner and decided on veggie pizza!

Our cooking adventure started at the Local Farmer's Market, where we picked up mushrooms, squash and broccoli for our toppings, and then Dillons for the dough, tomatoes and cheese. Using all these ingredients, plus a few more staples, we were able to make up some very delicious pizza. I present to you the recipe to our success!

 Fiber Friends Homemade Veggie Pizza.


Ingredients (makes 3, about 8 slice pizzas, can reduce amounts if needed)

-Lenders frozen white bread loaves, pack of 3 (or any type of froze bread dough loafs from the store)
-3 cans of whole tomatoes
-Fresh or dried Basil to taste
-Fresh or dried Oregano to taste
-Salt and pepper to taste
-Fresh or dried Garlic (equivalent of 4 cloves, plus extra for brushing on later)
-Olive Oil
-Mozzarella cheese, or cheese of choice
-Veggies! We used yellow squash and mushrooms (had planned on using broccoli but ended up forgetting about it until it was too late)

Step 1:
Begin by making the sauce. We followed this recipe for our sauce and it turned out amazing!
The sauce begins by browning the garlic in olive oil, and then adding your basil and oregano, followed by the tomatoes which are then cooked until the thickness of your liking.  We did ours for at least 30 minutes and it was still a bit thin, but turned out amazing.

Ok...we burned the garlic on the first try. Just FYI to everyone to keep a close eye on it!

Yum! Tomatoes! And the basil was fresh my aunt's garden, which made this even better!

Step 2:
This is where having a partner can help, but isn't necessary. While the sauce is being made, spread out your dough on a pan. I noticed that I had to knead it quite a bit first since the dough we were using was originally intended to be baked as a loaf and not spread out. But with much kneading and pulling and stretching, it will be a success! The dough as it turns out is perfect for making pizzas.

Since it didn't seem like they would combine well together, and we had plenty of stuff, we went ahead and used all three loaves and made 3 pizzas!

By making the bottom thinner than the sides, we got a doughy yet amazing crust!

Step 3:

At this point, prepare your veggies. It's a pretty self explainatory step, basically involving a bit of chopping and slicing. The yellow squash we got was absolutely amazing, and the mushrooms we had picked out were massive! YUM!

Another idea we decided to do was to coat the bread dough in a mixture of olive oil and garlic (seen in the cup above) which added an extra brown to the pizza as well as making it that much tastier! We also prepared more fresh basil to put on top!

Step 4:

By now you should be ready to pre-heat your oven (we didn't do it sooner because we didn't want to waste energy). Set it to the instructions on the bread dough bag, ours was 350 degrees. While this was happening, we sauced and topped the pizza. An idea my Mom introduced me to with homemades pizzas is to do sauce, then cheese, then toppings, then more cheese. It keeps the toppings from sticking to the crust and also just tastes better.

Almost baking time!

Step 5: 

Place in oven (when oven is ready) and watch carefully. Every pizza is different, but ours only took about 15-20 minutes to bake, and our crust was crispy on the bottom and soft on the edges. It really comes down to how you like your crust done.

SO CLOSE!

Step 6:

When you think it's at the point you want to eat it, take it out and enjoy! And what can go better with homemade pizza than a nice beer? Or in our case, hard cider, which is pretty much the greatest thing ever!

Ready to cut!
'Bon Appetite!

This was by far the best pizza I've ever had and Ivy agreed completely with me? What made is so amazing? I think it was the sauce with the seasoning and fresh basil, as well as coating the crust in olive oil and garlic. Just a couple secrets I plan to do from now on for my pizzas!
I hope you all enjoyed me very first MIY Monday! If you want to join in, just fill out Mr. Linky and feel free to take my banner! I can't wait to see what you guys may have up your sleeves!


In other news, I started Tour de Fleece yesterday and although I wanted to get .5 oz done a day, this seems like a very unlikely goal. I spun for TWO HOURS and only got .3 oz done! Yikes! I will keep on spinning though! Expect some photos tomorrow for sure!

~Lisa